
Let’s face it — if you’re using your Gmail account for more than occasionally contacting friends and relatives, it’s likely that it’s spinning out of control. Between work-related emails, online events, invitations, advertising from your favorite retailers, and just plain spam, you’re going to find it difficult to keep track.
There are a variety of ways to organize your email, and one powerful option is to apply labels, Gmail’s analog to folders. Putting labels on emails makes them easier to deal with. For example, you can label everyone you need to send holiday greetings to; everyone who expressed interest in buying your graphic novel collection; everyone working on your current video project; everyone who you knew in college — the possibilities are nearly endless.
Here are some basics and some strategies for using Gmail’s label features. Note that all of them are done on a desktop computer; there are different ways to manage labels on a mobile device, which I’ll talk about at the end of this article.
Create labels
In order to start using labels, the first thing you need to do is create some. There are a couple of ways you can do that.
First, you can create a label from Gmail’s left-hand column:
- In the left-hand column, scroll down from Inbox until you get to “Manage labels” and “Create new label.”
- Click on the latter and enter the name of your new label. You can nest it under an existing label if you want.

You can also create a new label and immediately apply it to several emails:
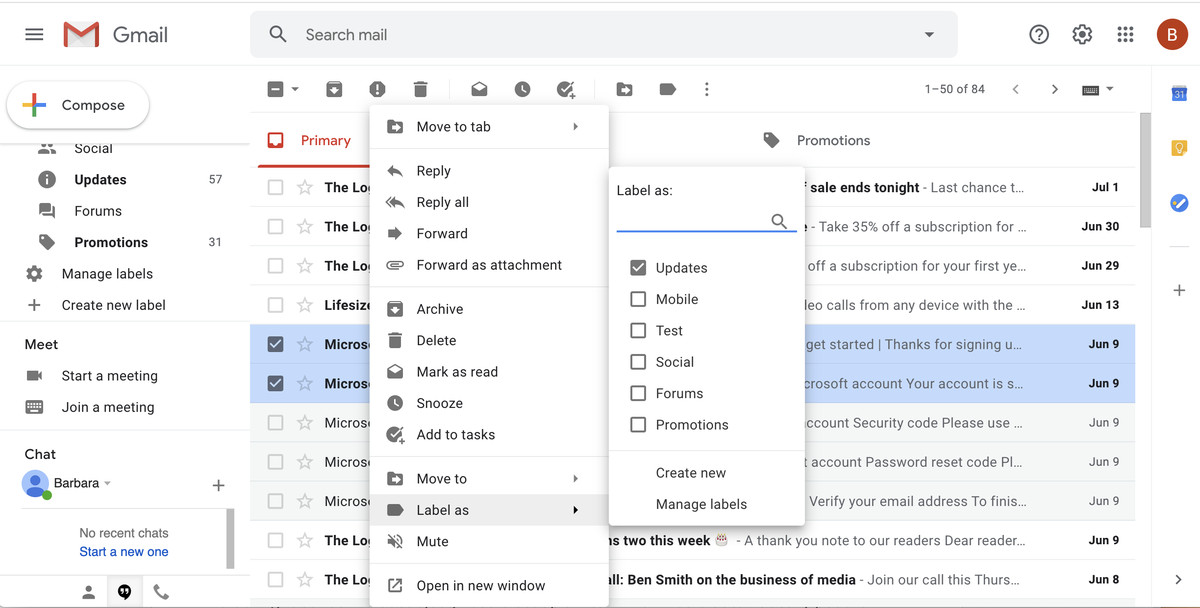
- Select the emails you want to label by checking the boxes to the left of the emails. When you’re ready, right click.
- Hover over “Label as.” You can type the name of your new label into the field on the pop-up window and hit the Return key, or click on “Create new,” where you can enter the name of your new label and nest it under an existing label if you want.
Color your labels
One of the simplest things you can do with labels in Gmail is to give them colors. It may seem like a small thing, but if you’re browsing through your email, colored labels make it immediately clear what category an email belongs in.
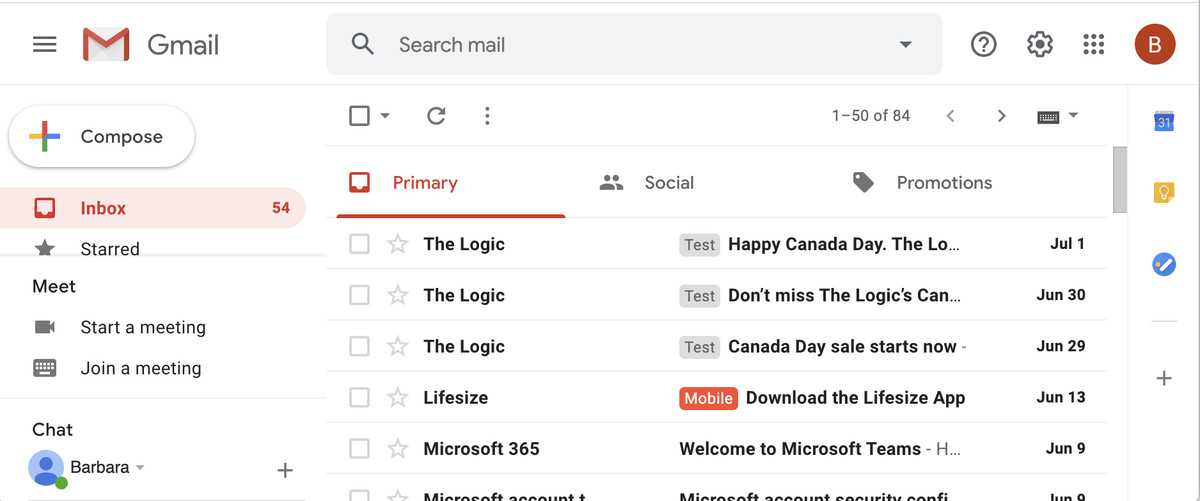
To assign colors to a Gmail label:
- Hover your cursor over the label’s name in the left column.
- Click on the three dots to the right of the label’s name.
- Click on “Label color.”
- Select the color you want to assign to that label — you can either choose a basic color combination or create custom colors for the background and text.
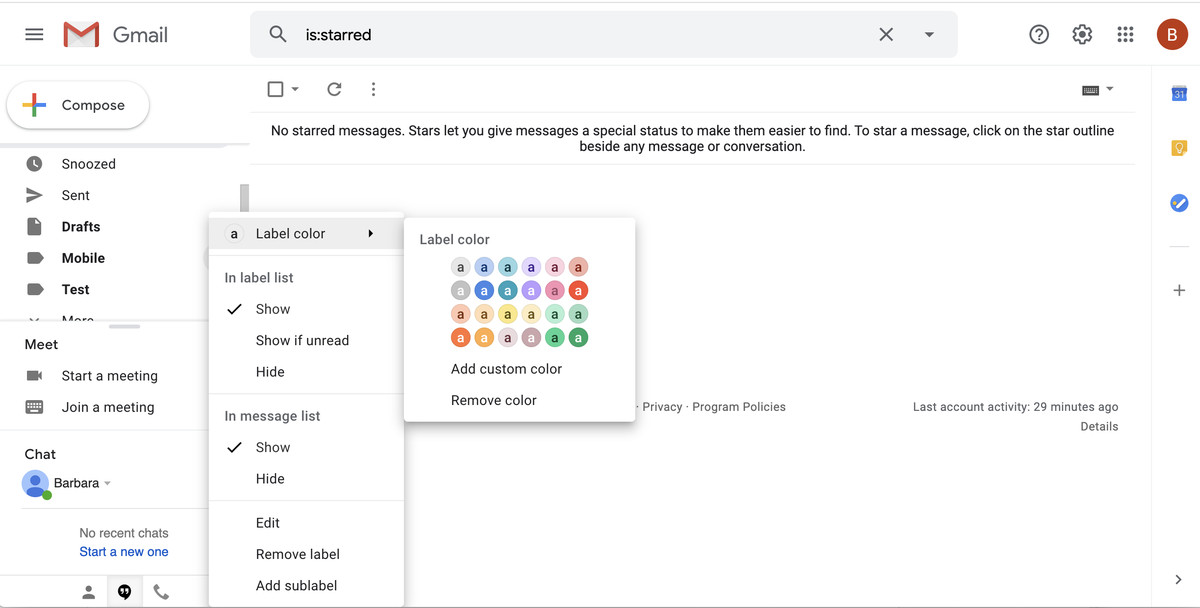
If you want to go back to the default colors (black text on a gray background), click on “Remove color.”
Apply labels automatically to incoming emails
You can automatically apply labels to emails as they come in. For example, if I were planning to write a story about different types of face masks and wanted to label any emails that might concern that subject, I could set up a filter which would automatically put the label “mask” on those emails. Like this:
- First, create the label you want. In this case, I used the directions above to create the label “Masks.”
- Go to your Gmail search box. Click on the small arrow at the right of the search box to get the advanced search.
- Put your search term in the appropriate field(s). For example, to create my search, I will look for any email that has the word “mask” in it. I can also just apply it to emails that end up in my Inbox (so that I won’t label any emails that end up in Spam) by clicking on the field next to “Search” and selecting “Inbox” from the drop-down menu.
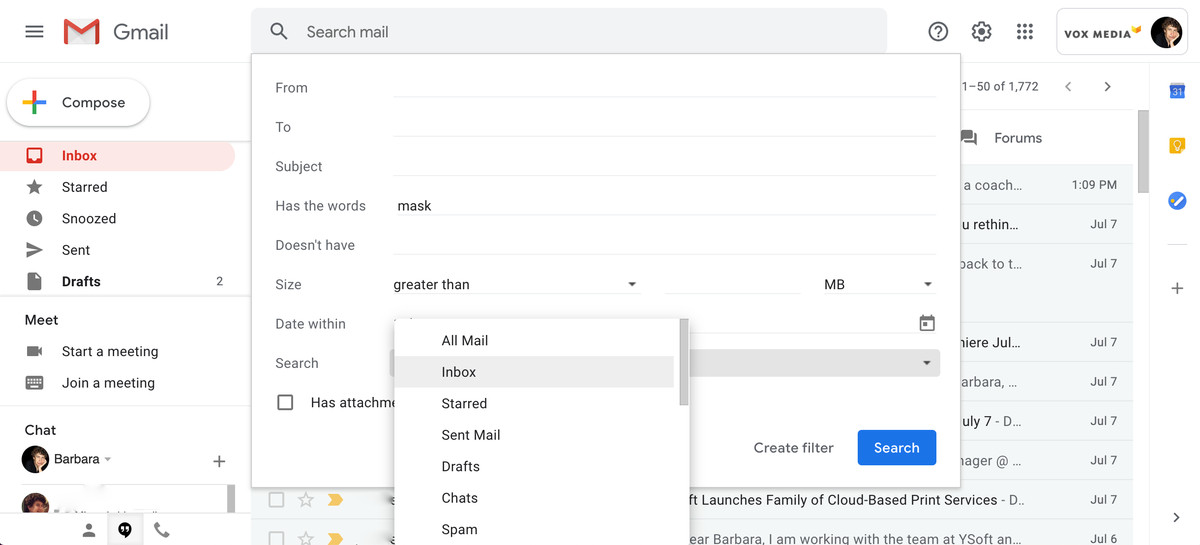
- Click on the “Create filter” button.
- There will be a warning that several types of filters won’t apply to incoming email. Click “Okay” to show you understand.
- You’ll then be brought to a page that lets you choose what you want the filter to do. For example, I could have the filtered emails immediately deleted or archived, marked as important (or as not important), or forwarded to another address, among other options. In this case, I’m going to check the box next to “Apply the label:” and then choose the label “Masks” from the drop-down menu. (You can also create a new label here, if you wish.)
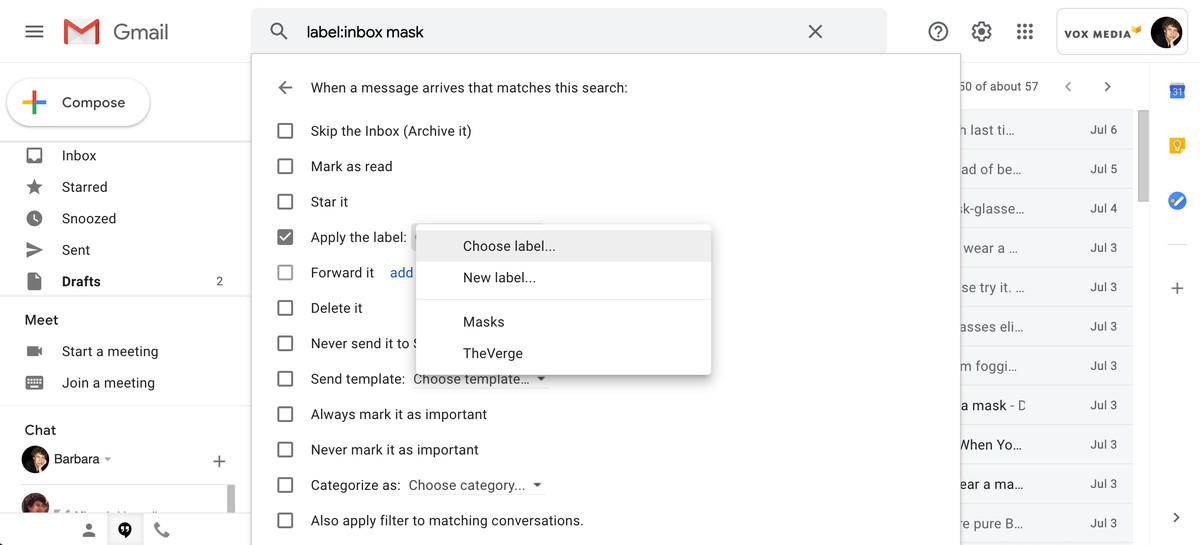
- This will only label future emails. To apply the label to current emails as well, also check “Also apply filter to matching conversations” which appears at the bottom of the checklist. (Note: This last one is a somewhat quirky feature, so it may not work in all cases.)
- Click “Create filter.”
Edit your filters
If you want to edit or delete any of your filters, you have to do that through Gmail’s main settings page, which is accessed by clicking on the cog in the top right corner and then on “See all settings.” Then:
- Click on the “Filters and Blocked Addresses” tab.
- You’ll see a listing of all your filters. To individually edit or delete one, click on the “Edit” or “Delete” links at the right of each label.
- You can also delete or export a group of labels by checking them off and then clicking on the “Export” or “Delete” links at the bottom of the list.
Show or hide your labels
When you have a lot of labels, they can be overwhelming, and so Gmail has ways in which you can show or hide specific labels.
If you click on “Manage labels” in the left column, you’ll be brought to the “Labels” tab on the Gmail settings page. Scroll down the resulting page to find a list of all your labels.
There are two ways you can tweak whether a label is visible: “Show in label list” and “Show in message list.” “Label list” refers to the list of your labels in Gmail’s left-hand column — it is handy because you can click on the name of a specific label to search for all emails with that label. Here in settings, you can choose to show that label in the left-hand list, hide it, or only show it if you have unread emails with that label.
“Show in message list” lets you show or hide the label in the main message window — in other words, you won’t see the label next to the email’s first line(s). The email will still be labeled, however.
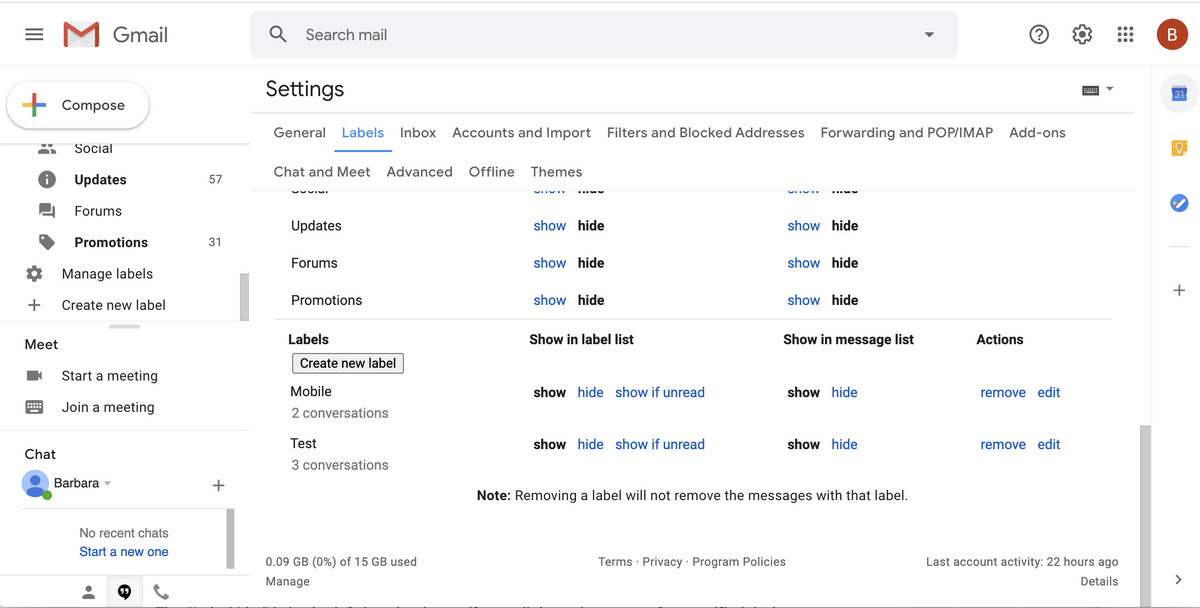
And finally, you can edit each label or remove it entirely. (Removing it will not delete the email, just the label.)
Manage labels on a mobile device
While Gmail labels have to be created using a computer, and more complex operations have to be done on a computer as well, you do have some options on how labels are used on your mobile device.
To manually add a label to an email:
- On both an iPhone and an Android phone, open the email you want to label.
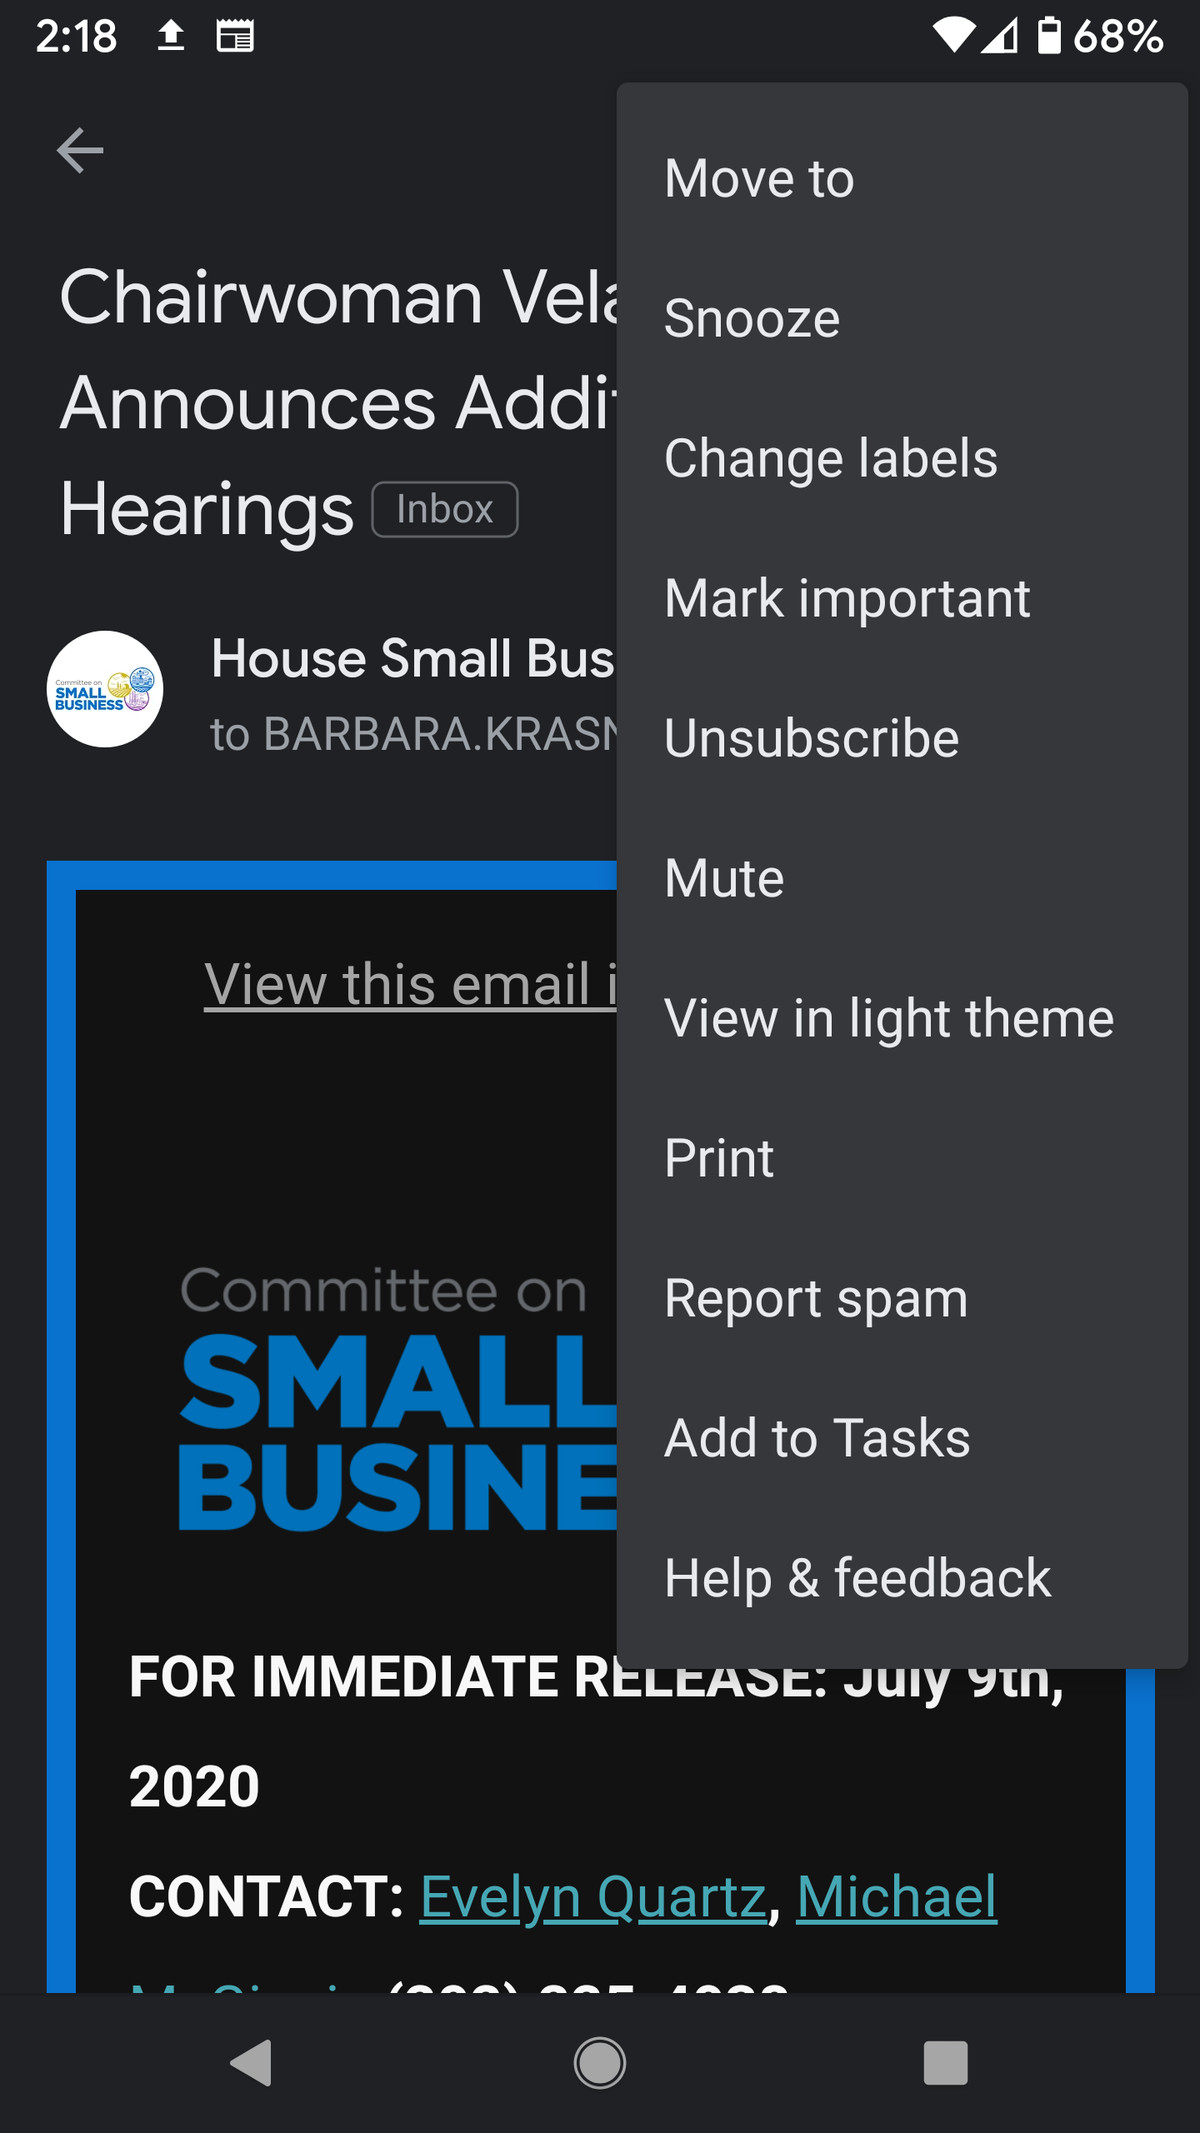
- Tap the three-dot icon in the top right of the screen.
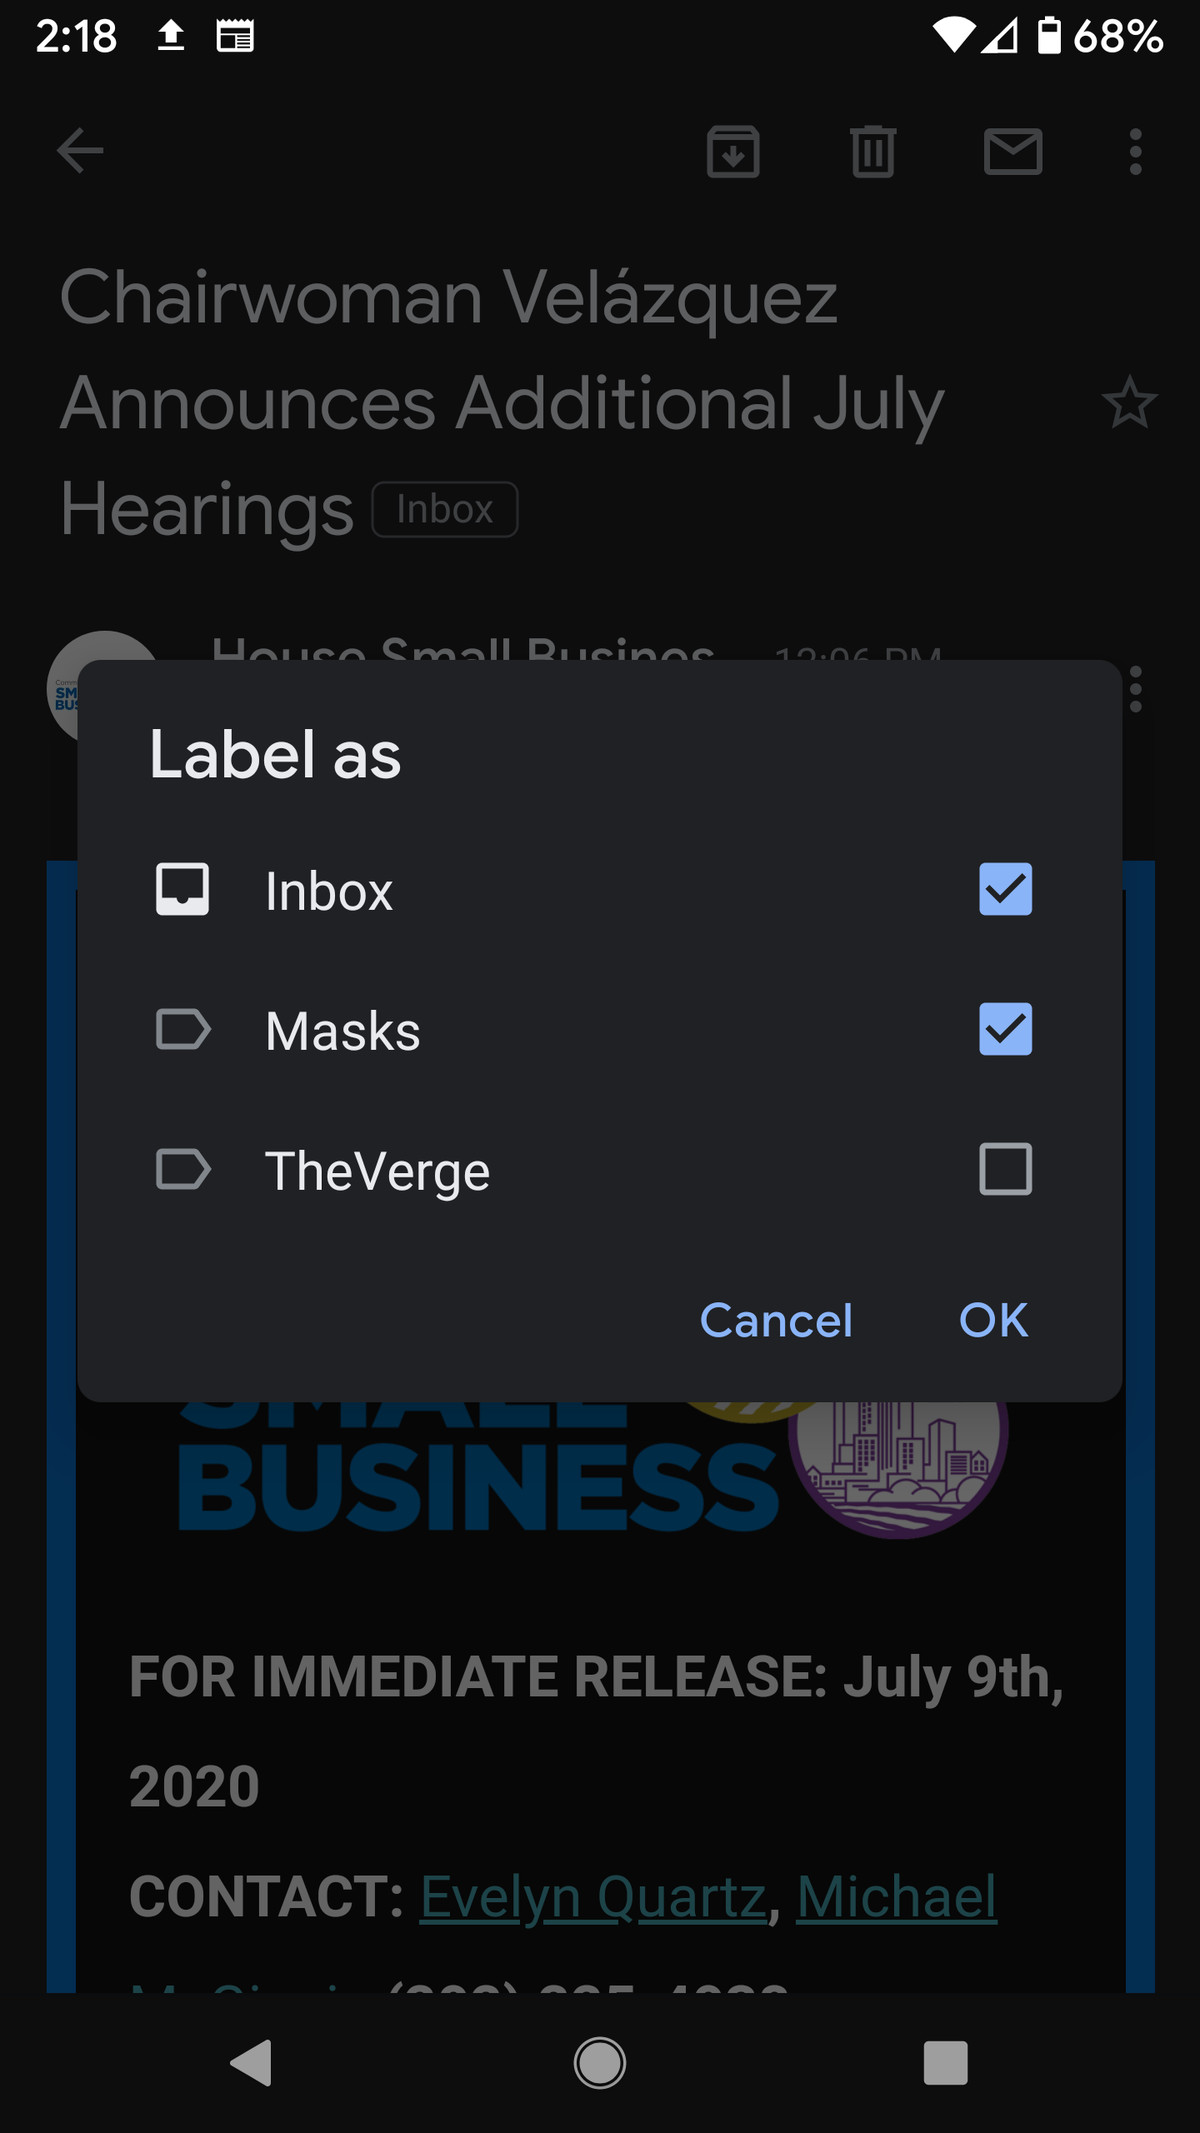
- Select “Change labels.”
- Select (or unselect) the labels you want to apply to that message.
If you’re using an iPhone, you can add labels to more than one email at a time:
- In your email listing, tap the icon to the left of each message you want to label. The message will change to a check mark.
- Tap the three-dot icon in the top right of the screen.
- Select “Change labels.”
- Select the labels you want to apply to those messages.
You can do some basic label management on a mobile device as well, but what you are able to do depends on whether you’re using iOS or Android.
To manage your labels on an iPhone:
- Tap on the three-line hamburger icon in the top left corner.
- Scroll down and select “Settings.”
- Tap on the Gmail account you want to tweak.
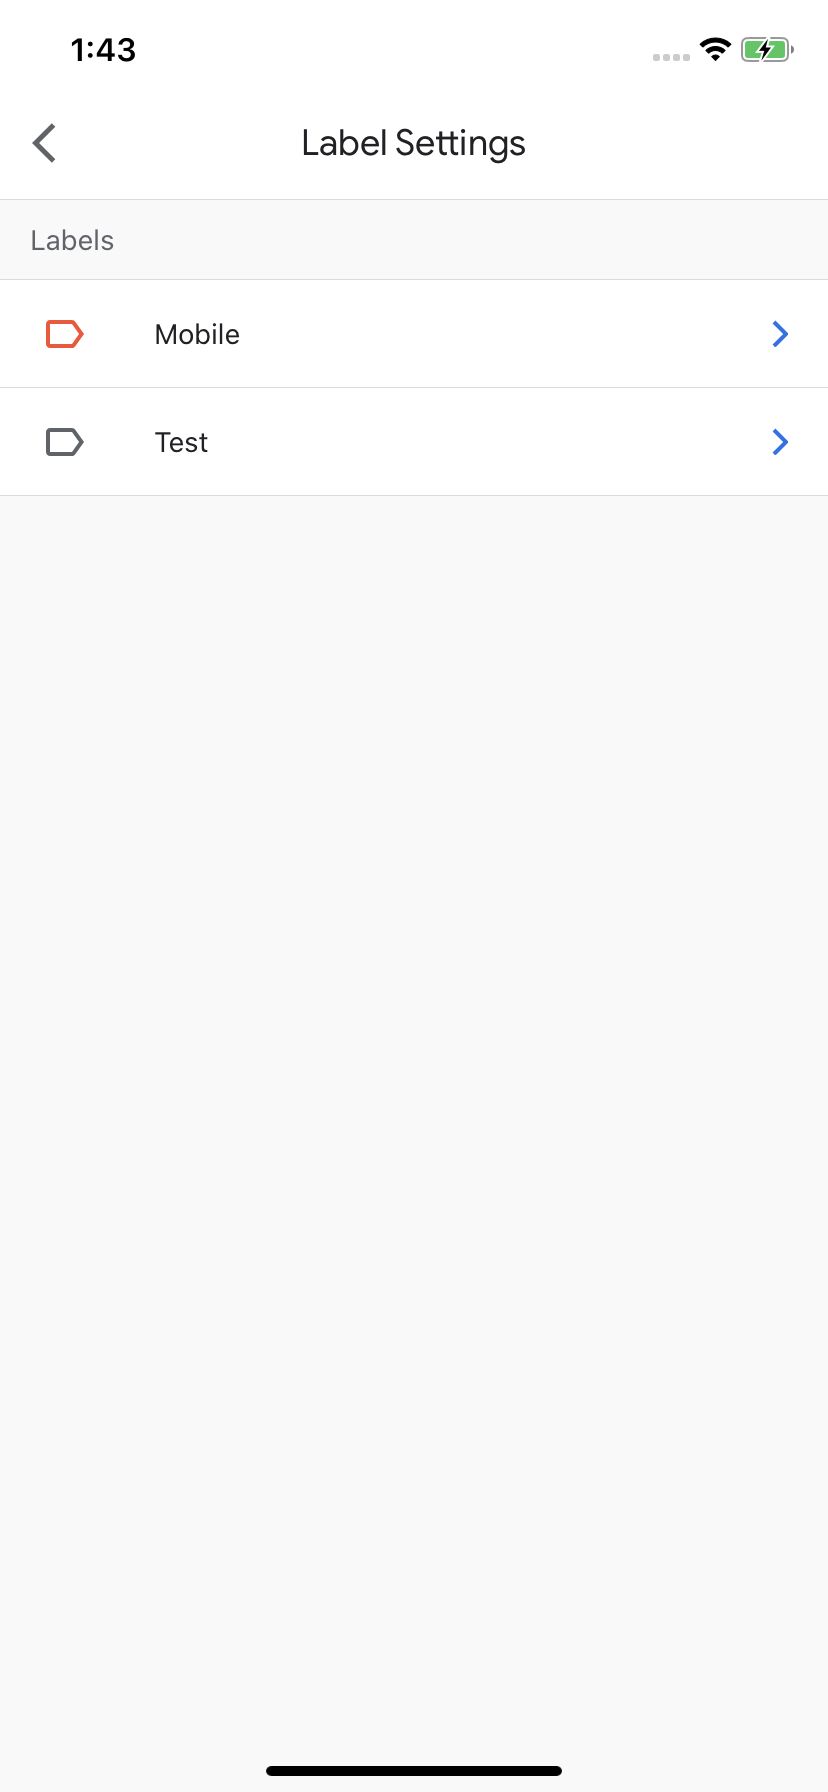
- Scroll down to and select “Label settings.”
- Select the label you want to adjust.
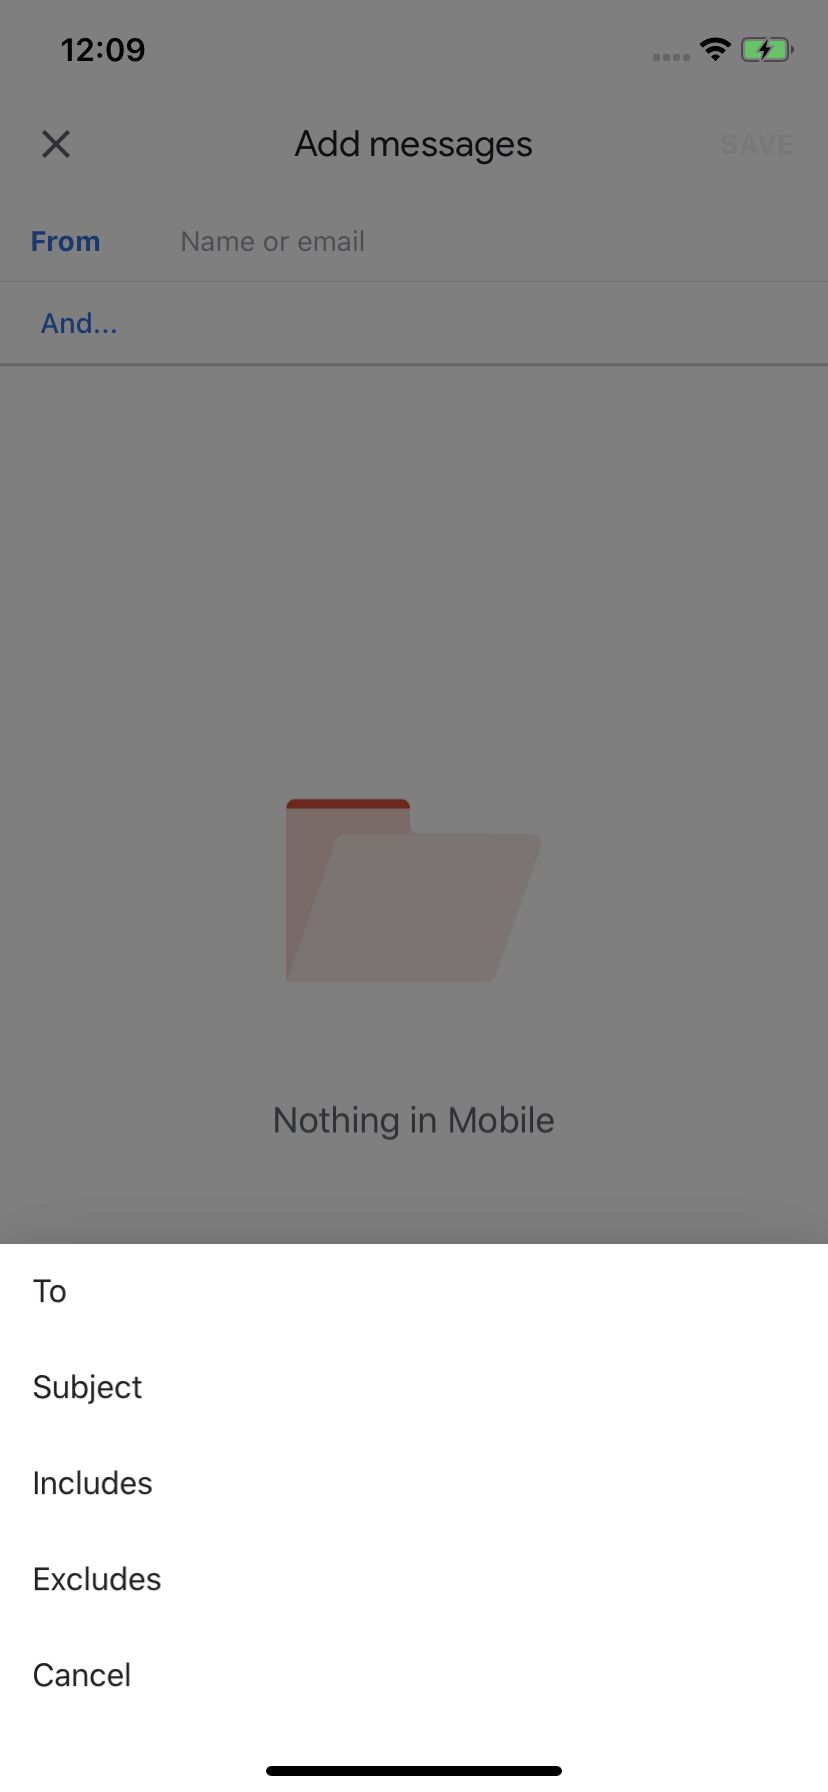
- Tap “Add…” if you want to add that label to future messages. You can specify a number of factors, including who it’s from, the subject, who it is to, and words to include or exclude.
- You can also tap “Name” to change the name of the label, or “Delete <label name>” to delete the label.
On an Android device:
- Tap on the three-line hamburger icon in the top left corner.
- Scroll down and select “Settings.”
- Tap on the Gmail account you want to tweak.
- Scroll down to and select “Manage labels.”
- On an Android device, the only thing you can really adjust is whether your mobile device will sync the labels with your computer. The page that comes up after “Manage labels” lists all of the categories that Google included (such as Primary, Social, etc.), and after that, all of your labels. It also shows whether the categories / labels have been synced.
- If you want to sync your labels, scroll down to the name of the label and tap on it.
- Tap on “Sync messages.” No messages will download, but the application of that label to the appropriate messages will sync. You can choose to apply the labels to messages that have arrived within the last 30 days or to all messages.
- Once you have marked the label to sync, you can choose whether you want to receive a notification on the phone each time a message with that label appears.